Sunday, February 23, 2014

DIY Murphy Bed...the inexpensive solution

Due to the size of our house, we needed the second bedroom to function as an occasional guest bedroom / office / many other things. So the only logical solution was a Murphy Bed.

After looking at the prices and options available this seem like a good opportunity to start a new custom project.

I found a Murphy Bed hardware kit on Ebay labeled:
"Economy Do-It-Yourself Murphy Bed Hardware Kit" sold by some nice folks (i'm assuming they're nice folks because they are from Canada) at Murphy Wall Beds Hardware. The kit was only $259 at the time, unfortunately it looks like they no longer sell them on eBay. It looks like the may still sell them on their website for abour $389.  There may be other kits out there for cheaper, but I can't vouch for their quality.  I would say the hardware I received seemed like good quality stuff and it still functions fine one year on. The rest of the Murphy Bed I built with lumber from my local big box home improvement store.

I didn't really have any helpers and I don't have a huge workshop, so I made do with what I had. With a little engineering my motorcycle ties acted as extra hands to help keep things square as I put together the frame.
Making adjustments to the amount of springs in each side was probably one of the hardest parts of this project. Eventually I rigged up another engineering feat with the motorcycle ties to help get springs in and out of each mechanism.  These things are seriously tight and will put an eye out if you're not careful.  They have some videos on their Youtube channel. If you watch the videos you'll think "Hey that girl can do it, it looks pretty easy!".  And you will be very wrong.

There were many trips in and out of the house and it was a lot of fun trying to get my relatively square frame to work in a house that has walls and floors that are anything but.


One of many fittings

I used a lot of shims to try and get all of the faux door spacings to look even. If i did this again I might think about using something other than a solid 1 x 12 (or whatever the width was) because no matter how straight that board is there is nothing to keep the center from bowing in or out. You could add some screws in the wall and try to keep the side straight, but then you would have some brackets or something that would be exposed when the bed is down.  I might have run a little 1x2 on the face of the sides to help keep the front straight.  Oh well it's straight enough now, we'll see how it is in a few years.

Once I started painting the piece, the wife decided she wanted to paint the faux doors of the Murphy Bed with that chalk paint that everyone seems to be crazy about.  The family stopped by and everyone contributed a little chalk to test out the chalkboard paint.


The nearly finished product

We even got an Artist's rendering of an Artist's rendering of a Boxer

I'll post some pictures of the fully finished product soon...

Thursday, January 30, 2014

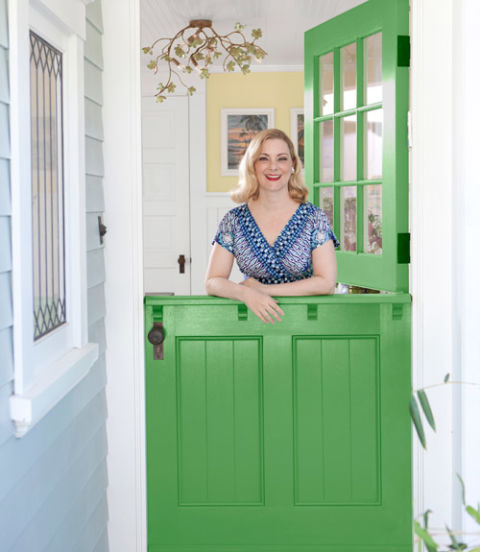
How to create a Dutch Door from an old wood door

photo credit: http://www.countryliving.com
My lovely wife decided she must have a Dutch Door. Possibly after seeing images such as the adjacent image in various magazines. Of course the door had to be old because "They just don't make them the same anymore". Which is true, but older doors come with their own set of issues.

So wifey found a wooden door at a vintage shop downtown. Unfortunately this door had around 8 - 10 layers of paint.  I left the wife to handle the paint stripping and she purchased this paint stripper and began to go to work on the Dutch Door...gradually. Over the course of about 6 months.

This was a project that wouldn't go away so I decided to step in, after all it was taking up room in my shed. Instead of the paint stripper that seemed ton only take off one coat at a time, I went after the door with ceramic sanding belts like this.

Then the paint really started to fly! The only real problem was getting into all of the crevasses, which had to be done by hand, and I didn't really have the patience to do a perfect job with the hand sanding. A bit out of character for me, but I just wanted this Dutch Door project done. After cutting the door in half I made a ledge for the bottom half and added some custom corbels. Here is a shot of the work in progress.

After sanding the door down to a paintable finish, I decided to try out my air spayer. This sprayer in combination with my tiny compressor turned out to be an exercise in frustration. So lesson learned, if you want to use an air sprayer, you're going to need a big boy compressor that can keep up.  The idea was to get some nice smooth coats with the sprayer and then maybe do a final coat with the brush. But the spray coats seemed to be enough, at least for now.

I'll post some updated pictures soon.

Friday, June 5, 2009

More New Windows

We decided to replace 4 of the 5 window in the sun room. The 5th window would be another special order window since it's 4ft by 4ft (not a standard size anymore). The other windows were not standard size either, but with the help of uncle mike we built all new supports for the windows and in the process sured up a lot of areas that had termite damage.
This time we got the Pella windows from Lowes and I would say it's worth the extra couple of bucks over the home deopt windows, just because they have the cool feature where the window folds inside the house so you can clean both sides of the glass from inside the house. Other than that a couple windows make some noise when they open and some of the screws on the latches don't screw down all the way, but if the little lady would have allowed it, I'm sure they could have been replaced no questions asked...pick your battles...


When we removed the old windows, there were no supports between the 3 windows.We built supports above, around, and between the 3 new windows.
Hard to believe we removed 4 windows, built new supports for new windows and replaced all with new windows in one day.

Friday, May 29, 2009

Cabinets!

After spending months of planning with the pre-fab screm em' together cabinets in mind. "We" of course had to change our mind and special order some different ones from Home Depot. We got the "American Craftsman - Del Ray series" after the planner at the Depot assured us that any of their cabinets would be fine for Granite countertops (the counter tops were another change in plans). But they look nice and they have so many adjustments, that if any thing is a little off when they arrive, it can be fixed. Hopa was quite relieved we didn't have to send anything back and further delay the Kitchen we desperately need.

...and drywall for all

We put the sheets of drywall up ourselves, us being myself, Hopa, Chet, and uncle Mike on various days and weeks. Then I hired a guy to mud and texture the ceiling. He did a good job and as the drywall gets finished, it starts to look like a house.


Sunday, April 26, 2009

Insulation & Drywall

We were going to to do the cellulose insulation in the walls and in the attic, but we decided to focus on just getting the kitchen done for now. The cellulose thing is really a much bigger project, what with the machine and all the bags you have to buy, someone to hold the hose, someone to shred and feed the chunks in to the machine, etc, etc. So we went with the itchy stuff for now and covered it up with some dry wall sheets. At least we know one wall in the house that has insulation now.

Friday, April 24, 2009

Kick out the Lash

How to break off Lash spacers after the mortar hardens...fast.